The Captain's Table : Creator's Challenge Nov 22
- Jan 23, 2023
- 2 min read
In November I participated in a creator's challenge as part of the real-time artist bootcamp I'm doing with Mastered. The aim for each of these is simple - we're given a brief which we're meant to complete within a 6 hour time frame. These challenges run monthly and this was the second one that I was participating in.
The theme for this challenge was Pirates of the Caribbean with a brief of creating an object or environment inspired by films.
Around this time I had mostly been focused on learning Substance Painter and Maya. Thus I decided that I would like to make some small, simple props which could make up a pirate captain's desk.


Left: The pirates films inspired many of the objects Right: Concept sketch
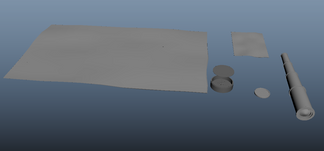
I started with a quick sketch to work out layout and decide which objects to make. I wanted to make a coin, a spyglass, a compass and some books and maps, with the stretch goal of making a key if I had time.
I started with modelling in Maya. For this project I was relying on most of the detail coming from the textures I created in substance painter, so I made the models very simple to save time. This also meant that they were easy to UV. The compass was the most difficult to create being a somewhat complex shape. I decided to make the glass a separate piece so that I could adjust it more easily in unreal as glass can be challenging to texture.


Above: Models in Maya with close up of compass and it's UV map
After modelling, I UV mapped each model individually and exported them as FBX files to bring into substance painter. You can find the detail of the process I went through in substance painter for each object below and accompanying images of the process.
Spyglass
I created folders with a black mask to separate the three different materials on the spyglass - leather, bronze and glass.
For the bronze sections I added a distressed bronze material that I found in the library. On top of that I added a layer of scratches through a fill layer with a grunge map. More details were created using alpha brushes. I added a stamp on the side and some ridges to the rings for extra detail.
For the leather I added a leather material from the library and added additional fill layers with generators to add more scratches and damage. A fill layer with dirt generator was added on top.
For the glass of the lenses, I painted the areas with a dark blue, turning the roughness down and the metallic up. I added extra details such as cracks using an alpha brush and added some dirt with a generator round the edges.
With all the materials completed I added some more dirt focusing on the corners of the model.

Coins
I wanted to make the coins look similar to the ones in Curse of the Black Pearl, so I found a graphic of the pattern online and traced it in photoshop. I uploaded the pattern as an alpha brush.
I found a pre-existing gold texture in the library and stamped the design onto the coin on a paint layer with the height adjusted to give the correct depth.
I added grunge around the design in order to make it stand out more. More edge dirt was added through fill layer with a generator.
In order to add some variation to the coins, I created two versions, giving the second one deep surface scratches. This was achieved by creating a fill layer with a black mask; to which I added a grunge map of scratches.

Maps & Papers
All of the maps and papers were created in a similar way. I first found the art I wanted on google. I decided to go with images I found of nautical maps of the Caribbean and some old diary entries.
I downloaded a paper texture and altered the colour and texture to be more inline with old parchment. Yellowing the paper and adding more folds made it look more aged.
I uploaded the images I found and painted them onto the models using the projection tool. On top I added a light layer of staining by making a black mask layer with a fill.
Additional detail such as ink spills, staining and notes were painted onto the map through a paint layer using various blushes and alpha brushes.
I created two map variations and one letter to serve as the base of my creation.

Book
I created two folders with black masks to separate the leather cover from the pages.
From there I added a damaged leather texture from the library to the cover and adjusted the wear, colour and leather grain. On top I created a fill layer with a generator to add wear to the edges.
I created a paint layer and used different brushes to add details to the book such as golden embossing and creases in the leather. I added a grunge map on top of the embossing to make it worn.
Two more paint layers were created to add stains and scratches.
I added the paper texture that I used for the maps, and on a paint layer used a rake brush to add raised bumps to simulate the pages. Extra stains were then painted on top.
I created two variations - one brown and one green.

Compass
The FBX model for the compass was split into three parts - the compass body, the point and the glass. This made the texturing easier.
Due to there being glass, when baking the textures I added an opacity channel and changed the shader to include alpha blending.
I started with the compass rose which I applied a simple gold material to. I then painted red onto the northern point.
For the glass I painted on a light blue with the opacity turned up. On a separate layer I painted on some cloudiness using a dirt brush.
I applied a layer of dirt with a mask editor and added some light scratches on top with a grunge map.
For the brass I created two folders with black masks, separating the compass rose from the rest of the model. I used the projection tool to paint on a rose that I found online and added some additional stains on top.
For the rest of the body I added a brass material from the library on top. I added generators on top to add dirt and wear focused around the edges.
With a brush I painted on some rust in a light turquoise with a dirt brush and made some additional deep scratches. I created extra detailing by painting some border lines and scratches onto the sides with only the height of the texture being affected.

After completing the texturing I exported the texture maps and took it all into Unreal Engine. I placed the items on a table I had created previously; composing it like the sketch I made at the beginning. Some simple lighting and a rope asset that I found in the quixel library tied it all together.

Above: The setup within unreal engine
The aim of the challenge was to see what you could in a limited timeframe, and I feel like I met most of the goals that I set out. If I had more time I would have maybe made the materials in substance painter from scratch instead of finding them from the library, but I am very happy with what I was able to create.

Above: Final Render in Unreal Engine
To see the more of the final renders and other projects I've worked click here!
Comments